Monday, January 24, 2011

Monday, Monday

Need something to perk you up, make you laugh? I know I usually do on a dreary old Monday.
If you've never read the Cake Wrecks blog you are missing out on real belly laughs and some truly stomach turning confections.
All the featured cakes are professionally made, actually on sale! I mean, take a look at this little girls birthday cake. Terrifying!

The writers are also hilarious. You won't be disappointed:
http://cakewrecks.blogspot.com/

Friday, January 21, 2011

Charlotte Holmes

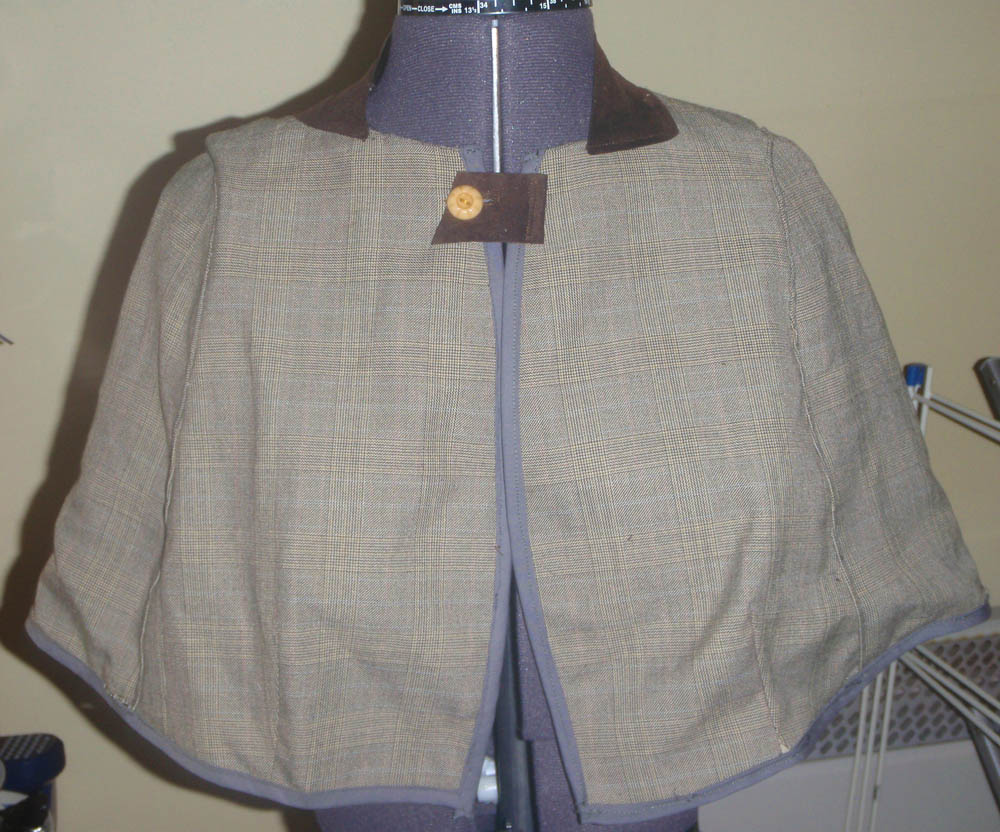
This little number is a piece I recently completed. It had been sitting in my UFO pile (that's "unfinished objects" to all you non-procrastinators out there) for so long that tackling was really a cathartic act cause I was just so sick of looking at it! By the way, does anyone else have more clothes in their refashioning piles than in the wardrobe or do I just have a problem?

And were back. So this cape began it's existence as a hideous, humongous suit jacket that fastened with a suede ribbon thingy. The only extra supplies I used in the refashion were bias binding and a vintage button.
My process was far from exemplary (even if you ignore the 2 year gap) and it's not photogenic inside but it's still effective and of course, unique!
A brief outline of this method would be as follows:
  1. Try on jacket and mark with chalk the length you would like the arms to be.
  2. With the jacket layed out measure a straight line from your chalk marks to the centre point and then come down about three inches and mark with chalk. Draw a smooth curve connecting your marks. Check you like the length then mark the back similarly.
  3. Pin lining to facing and cut your shape out.
  4. Unpick collar and sleeves.
  5. Pin the shoulders of your sleeves to the body and see what needs to be kept, add an inch or two for seam and then cut the excess from the sleeve.
  6. Re-attach sleeve.
  7. Bias bind bottom of your cape and up the open centre and collar if you like.
  8. My collar was made from the suede ribbon which came with the jacket I simply sewed it over the raw edge left from the unpicked collar.
  9. Make a fastener from a button, ribbon or even a cardigan clip (which I hope to have a tute up for very soon)
Do excuse the death stare. No future as a model I fear.

Now if you are looking for a cape How-To that's a little less rough then follow the link below and learn from the ever-resourceful Meg of Enderby Designs.
http://www.threadbanger.com/episode/THR_20081205

Tuesday, October 12, 2010

Wooly Escapades

The colder days are blowing in complete with nipped noses and ears. While I haven't come up with anything in the way of an attractive nose cosy I have got the ears covered (no pun intended).

Inspired by the basic concept of this lovely creation,
I decided to crochet a version and whittle down some of my stash of random single balls of wool.
It's not as soft looking as the knitted version, an aspect of crochet I often lament, but it works up faster and I think I might love shell stitch. This project is so easy, honestly, a great starting point for someone just starting crochet who wants to try a more decorative stitch.
The wool I used was 50g of Jaeger Siena 4 Ply and the hook was 3.5mm

So on to the pattern my lovelies.
Chain 32,
Row 1. Single crochet into 2nd chain from hook, skip 2, {double crochet 5 times into the next stitch, skip 2, single crochet into next stitch, skip 2} repeat x4. For the next shell just double crochet into the stitch three times. Each row should have 4 and a half shell patterns.
Row 2. Chain one, turn, {single crochet into next stitch, skip 2, double crochet 5 times into the next stitch, skip 2} repeat x4. On the last shell double crochet into the stitch three times.
Row 3. Repeat Row 2
Row 4. Repeat Row 2 ... and so on
Continue like this until you have a strip of about 61cm (24 inches).

When complete twist in the centre. You can sew together or crochet the ends together. I crocheted and this is what the seam looks like:
I'm currently working on a slimmer one in purple which I may put up for a giveaway if you are really good! As always if you have any question just holla!

Friday, September 10, 2010

Let's take it to the Street's

Feel like picking up some Sailmaker's Daughter pieces, like the ones below, from a brick and mortar shop? A month ago I would have said "tough luck dumb-dumb".

But now, well now things have changed. Wait for it.....
I have a concession in Lucy's Lounge in Temple Bar. HURRAH!

I've been selling there for just under a month and it's going really well.
Lucy's is such a quirky spot and if you have an eye for the vintageous then you should check out all the lovely wares. Deirdre, the owner is very cool and the place has a really welcoming vibe.
Check out their blog for more info on Lucy's Lounge: http://lucyslounge-dee.blogspot.com/

Thursday, August 19, 2010

Swap Meet

I've joined a new site called the Swap Workshop. I was thinking it would be a great way to move some of the impulse purchases of supplies I've made - you know how it is: "Oh, this mini chainsaw is half price, it's so cute and I've been meaning to try my hand at ice sculpting". Story of my life.
I'm hoping it might also be a way of moving items which have been ignored on my etsy as I don't believe in renewing an item more than 3 times unless it had A LOT of hearts.
Swap shops could be a great boon for the crafters out there, after all we are each others best customers, plus you can swap vintage or supplies as well. Here's the blurb from the site if you think it sounds like your cup o' chai:

If you are anything like me you work very hard for a living, raising the kids, running the house and even holding down a "proper" job?

On top of this you choose to open your online shop because you love to make things or are passionate about life gone bye. In these difficult times wouldn't it be great to supplement the sales from our shops and get those little extras by trading or swapping the things we have!

Now, life is hectic enough without involving ourselves in another full time activity. So, what if you could choose a couple of items, list them somewhere and almost forget about them until another person wanted them? Sounds easy? Then Swap Workshop is the place for you.

In just the first 2 weeks, we have 35 new members, 40 listed items and so there is plenty to choose from. Membership is FREE, no item is for sale, just the cost to ship your item!

Take a look at our introduction and if you join before the end of August. You will receive free points when you list just 3 items!

Swap Workshop - the place to swap handmade, vintage or craft supply items!

www.swapworkshop.com

Have a great weekend guys. Smooches!

Wednesday, August 11, 2010

Fall Hard

I made it into another treasury (I said that like I'm always in 'em - alas not quite).
This Treasury focuses on the hues of Autumn and features many wonderful Irish etsy sellers.
It makes even a summer bunny like me think wistfully about wrapping up for the colder months.
My Orange you Glad Now earrings are included.

Tuesday, July 13, 2010

Skirting Summer

My skirt for the Summer essentials sewing has been finished for 2 weeks now but I'm only just getting round to posting it. I'm a disaster I know. I actually have a shrug finished too but I'll save that for another eon shall I?

This skirt is made from my Aunts curtain valances which she gave me before Christmas.
I love the flowery summer fabric.
I used a tutorial from burdastyle as my base and then changed it up a bit to suit the fabric and effect I was going for: http://www.burdastyle.com/projects/nayantara%E2%80%99s-quick-party-skirt

As you can see it's a little short which is why I didn't hem it and just left it overlocked. I do like the length though. It's racy!

This photo is the truest colour:


Here's the skirt with the (store bought) top that it was intended for. I wore it out with a bunch of the gals and everyone thought it was a dress. I like that it's versatile that way AND *it has pockets*.
Only a week left before I go on holidays to Marrakesh so I better get the sewing (and blogging) skates on to make the start of August deadline. Click the Summer Essentials button at the top of the page to see what the other participants have made.